|
|
Post by timone317 on May 5, 2014 23:33:39 GMT -6
Did i catch another one? Its midnight where i am now so technically...eh...guess it doesnt matter. Hope it was a good one juan. EDIT, looks like it was yesterday. Hm. Better late than never i guess
|
|
|
|
Post by timone317 on May 4, 2014 8:47:22 GMT -6
Finally caught one, have a good one loki
|
|
|
|
Post by timone317 on May 4, 2014 2:14:29 GMT -6
Completely forgot about this and just happened to catch it but...eh...its too early to say whether i liked it or not.
|
|
|
|
Post by timone317 on May 4, 2014 1:48:17 GMT -6
Very nice, i wasnt too sure about this but id definitely buy this
|
|
|
|
Post by timone317 on May 4, 2014 1:45:52 GMT -6
Ah...i recognize you from sideshow collectors...nice to see you here/nice work on the vegeta parts
|
|
|
|
Post by timone317 on May 4, 2014 1:09:48 GMT -6
Late once again but i hope it was a good one EisCelsius |
|
|
|
Post by timone317 on Apr 28, 2014 18:37:52 GMT -6
|
|
|
|
Post by timone317 on Apr 27, 2014 19:29:23 GMT -6
It shouldn't. I didn't notice your earlier comment about the paint being inconsistent...with everything you've said it sounds like reaper might be right. It would be very easy to make a blend of real and fake parts and pass it off as a real figure. It's hard to say, the neck has a blue peg and the fake Vegeta has a white peg...but for all I know the person may have put a real neck in a fake torso. Any chance you could take a few more pics? Maybe a video?
|
|
|
|
Post by timone317 on Apr 27, 2014 11:40:18 GMT -6
Here you have the torso (ignore the Goku arms, I used the Vegeta arms for something else). 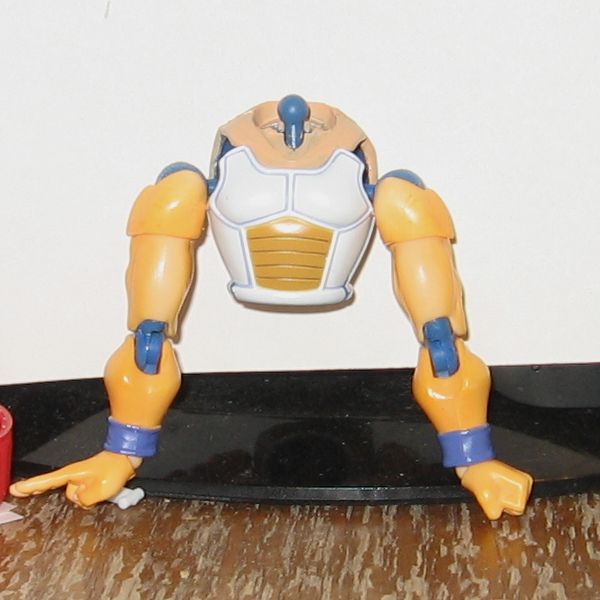 I think I said don't try to remove the front plate at the bottom...well that may actually be OK as long as you're careful. Just put a tool beneath the plate and wedge it out. There's a small section between the plate and inner box, it should help give a little leverage. 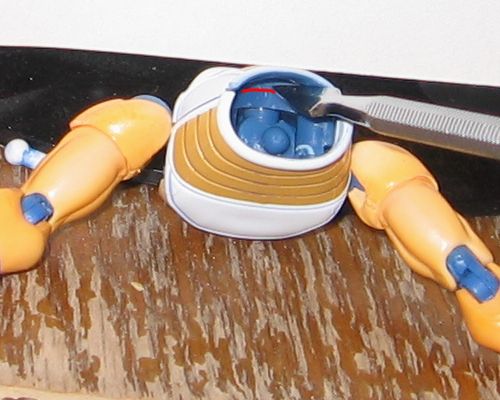 There you have it. At that point simply remove the screws and seek the problem. 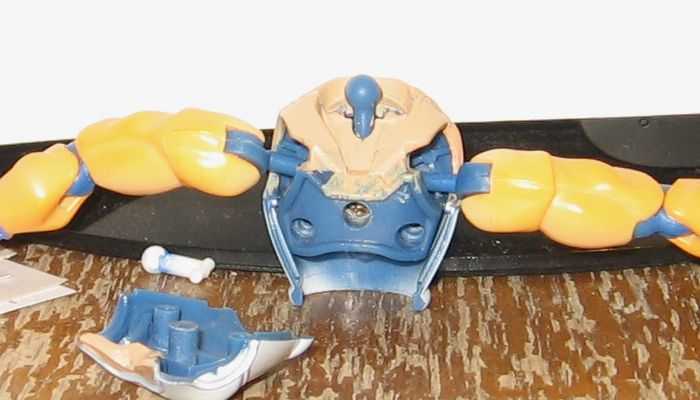 just showing these so you'll know what to expect. This is the front half of the box (I refer to the box parts as the spine). 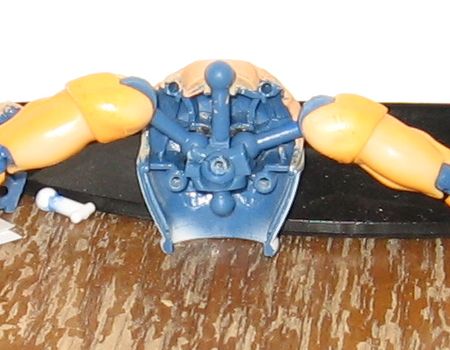 The back half of this box has been modified but it should look something like this. If there's a problem with the areas that hold the arm joints you may have an issue as repairing the spherical sockets can be very difficult. Not impossible...just tough. Hopefully you're just dealing with some loose screws. tagging you so you won't miss this, mmfsm |
|
|
|
Post by timone317 on Apr 26, 2014 20:41:59 GMT -6
Is SS3 Goku shorter than SS1 Goku in the anime and manga? I just didn't scale the image properly. All three figures have the exact same body mold and height. |
|
|
|
Post by timone317 on Apr 26, 2014 14:06:13 GMT -6
...dude. Have you done nothing but sculpt in the time you've been away? I mean that in a good way. That looks incredible.
|
|
|
|
Post by timone317 on Apr 26, 2014 1:41:38 GMT -6
I don't know Tim, I thought about it and I really don't want to risk damaging either figure, or significantly loosening the joints. Honestly, the skin colours are crazy different. I seriously doubt that it would look good anyway, as SS3 Goku's skin is far too yellow and regular Goku's skin is more pinkish in hue. eh, no big deal. How about this...can you get a face from the manga SS Goku and hold it next to the regular Goku head? (the reply came before I could even type this out. not worth a new comment) once again, no big deal as I already have my answer. Re-posting this for reference, I was able to find a review for SS3 Goku and the image quality was consistent with the images in the normal Goku review. I combined everything and figured it wouldn't hurt to post the results. 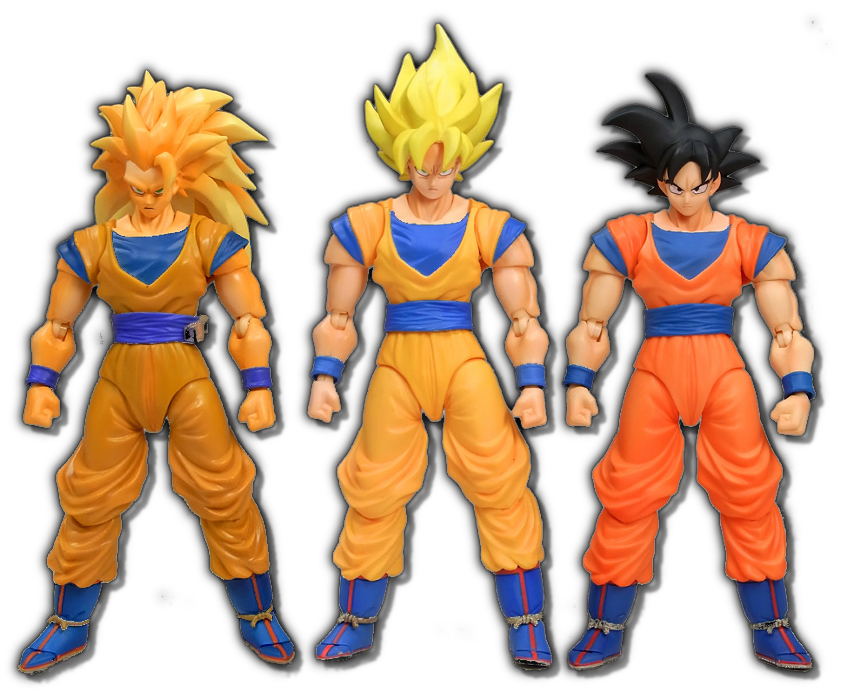 And the swap... 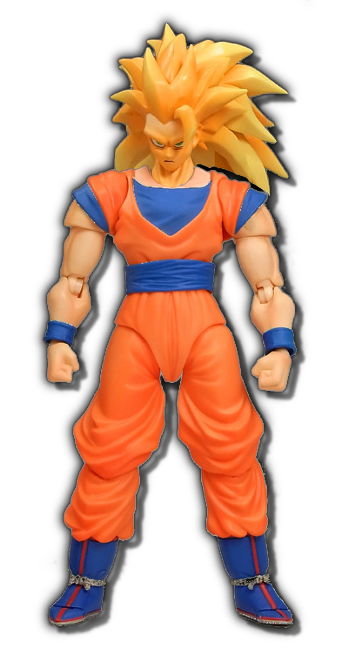 ugh. I was really hoping I could avoid repainting the SS3 Goku face but I guess I have no choice. |
|
|
|
Post by timone317 on Apr 26, 2014 1:38:59 GMT -6
If I don't have anything to do tomorrow I'll try to get you some pics from a spare bootleg Vegeta I have to show you what needs to be done
|
|
|
|
Post by timone317 on Apr 25, 2014 11:44:34 GMT -6
It isn't risky if you work carefully. you'll need to pop off the front portion of the armor. I wouldn't generally recommend doing that but since the figure sounds damaged already it should be fine. The front part is held by three pillars that fit into the screw slots. You'll need to slowly remove that part with a flathead screwdriver (come in from the side so you don't bend the bottom area). Once you get that off you can see the screws. Either tighten them or take them out, separate the torso, and see if the boxes that hold the arms have been damaged.
|
|
|
|
Post by timone317 on Apr 25, 2014 10:55:04 GMT -6
it's generally a good thing when the joints make noise on Figuarts figures, it means the joints are nice and tight. if it's really an issue a little dish soap might help lessen the noise.
It sounds as if the inner parts that hold the arm joints have worn out and that could be very bad news. There is a ball on the end of the joint and that ball is held by two small boxes in the torso. If you're lucky fixing it may be as simple as tightening the screws in the chest but if the boxes are damaged in any way you'll have to do a bit more.
|
|


